 It’s been a while since my last demonstration, so welcome to “How I Draw On My iPad-Part 10.”
In honor of spring and friendly garden bugs, I thought it would be fun to showcase a very simple image of a Ladybug. While you’re at it, don’t forget to check out Part 1 thru Part 9 and now, for your viewing pleasure here is my Ladybug.
All these demonstrations, like this “How I Draw On My iPad-Part 10,” continue to be very popular with my readers. I do enjoy using the Graphic (Formerly iDraw) vector-drawing tool for the iPad. This tool helps me create all the illustrations for my blog, blog articles and now my book and book covers.
The best way to learn a new tool is to just dig in and play with the tool and make some simple and fun images. I thought it would be cool to show you how to create a very simple ladybug with your iPad , a Stylus and the iDraw App.
Now let’s begin.
How I Draw On My iPad-Part 10 “Ladybug”
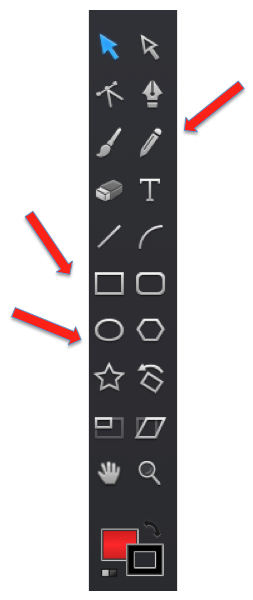
We will need 2 layers to create this ladybug drawing. The tools I’ll be using are the star/triangle, circle, and pencil tools.
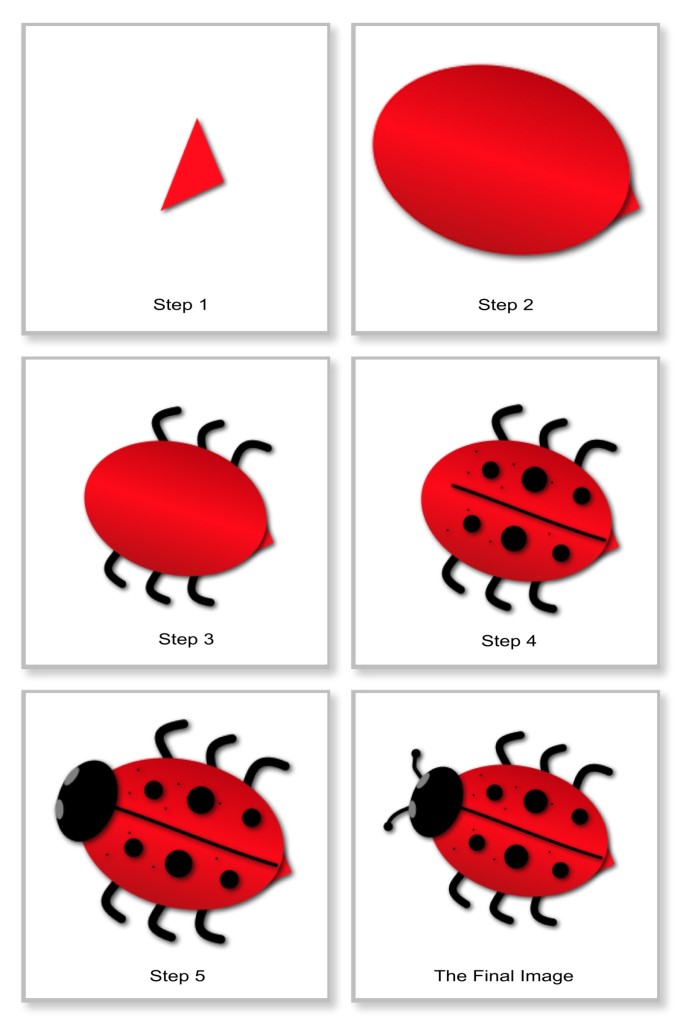
Layer 1 – The 1st layer is the canvas or background. I’ll use white and I’ll start with creating a triangle of red.
Step 1 – I’ll then create an oval just over the top of the triangle with a corner of the triangle peaking out. I will gradient tool (a slightly darker red on each side of the body) along with the drop shadow tool to create definition.
Step 2 – Using the pencil tool, I’ll create line drawings for the legs; 3 on each side of the oval.
Step 3 – Continuing to use the pencil tool, I’ll draw a black line down the center of the oval and add one large black dot and 2 smaller black dots on each side. Next comes some tiny black dots for interest here and there. I’ll add the drop shadow to the details to give the body more definition.
Layer 2 – The head and antennae are next.
Step 4 – Now on to some finishing touches on my ladybug by adding the head and eyes. Using the circle tool for the head, I create a black oval and place it on the opposite end of the triangle point (tail). I’ll also create two smaller gray ovals for each eye and place them opposite each other at the top of the head.
Step 5 – The final detail is the antennae. Using the pencil tool, I’ll draw two black lines on each side of the head. At the end of each line, I’ll add one dot.

That’s it; we’ve created a ladybug. How easy is that?
Now we’ll upload the finished piece to our Dropbox app. This will allow us to store the finished piece for use at a later date as a piece of art again in another creation. Note the ladybug on the flower petal in Part 3. 🙂
Now I’ll turn it over to you. With a little practice and patience, you too can have a great deal of fun and make your own flower creation.
If you enjoyed “How I Draw On My iPad-Part 10,” check out Part 1, Part 2, Part 3, Part 4, Part 5, Part 6, Part 7, Part 8, and Part 9. Enjoy.
